Speed Auto Override: Difference between revisions
Sean Sanders (talk | contribs) m (Sean Sanders moved page Auto Override to Speed Auto Override) |
|||
| (2 intermediate revisions by one other user not shown) | |||
| Line 6: | Line 6: | ||
===Methods Of Triggering=== | ===Methods Of Triggering=== | ||
The override mode can be triggered one of these ways: | The override mode can be triggered one of these ways: | ||
#Modbus command: A write to modbus register 45107 at the governor address will cause the governor to start the override timer with the written value, in seconds. For example, if '60' is written to modbus register 45107, the governor will go to high 'auto' RPM for 60 seconds. | #Modbus command ('''EIM Only'''): A write to modbus register 45107 at the governor address will cause the governor to start the override timer with the written value, in seconds. For example, if '60' is written to modbus register 45107, the governor will go to high 'auto' RPM for 60 seconds. | ||
#CAN command: A command might come to the governor from another module triggering the override. This is set up from the module used. | #CAN command: A command might come to the governor from another module triggering the override. This is set up from the module used. | ||
#'Discharge' input: The discharge pressure input can be configured to be used as the trigger to control the override mode. This is discussed in more detail below. | #'Discharge' input: The discharge pressure input can be configured to be used as the trigger to control the override mode. This is discussed in more detail below. | ||
More than one of the above can be used at a time. For example, if the 'discharge' input is used to trigger an override period, a modbus command will still be accepted and will become the new timer value. | More than one of the above can be used at a time. For example, if the 'discharge' input is used to trigger an override period, a modbus command will still be accepted and will become the new timer value. | ||
===Override Setup Page=== | ===Override Setup Page=== | ||
The override setup page is accessed from the governor setup, then "Pressure-Control Override Setup". The page is shown below. | The override setup page is accessed from the governor setup, then "Pressure-Control Override Setup". The page is shown below. | ||
[[File:Governor Override Setup.jpg]] | |||
The setting "Turn on 'Error Relay' output during override", if enabled, will cause the governor error relay to be on (closed to ground) whenever the override is active. This can be used to drive a lamp or to chain to another governor so that one master governor controls override on multiple units. | The setting "Turn on 'Error Relay' output during override", if enabled, will cause the governor error relay to be on (closed to ground) whenever the override is active. This can be used to drive a lamp or to chain to another governor so that one master governor controls override on multiple units. | ||
| Line 31: | Line 32: | ||
In this way, when the relay turns on, the discharge input becomes active. This example is shown below. | In this way, when the relay turns on, the discharge input becomes active. This example is shown below. | ||
[[File:Override wiring.png]] | |||
Latest revision as of 22:03, 29 July 2022
In some cases, it is useful to have the governor go to full speed during a pressure-control mode to anticipate an upcoming load change. The governor auto override allows for this.
In general, starting the override mode causes the governor to enter full speed for a given time period (e.g. 3 minutes). Once this time period expires, the governor returns to normal control mode.
The timer will start and count down regardless of control mode, but if the governor is not running in "Auto", the override timer will have no effect.
Methods Of Triggering
The override mode can be triggered one of these ways:
- Modbus command (EIM Only): A write to modbus register 45107 at the governor address will cause the governor to start the override timer with the written value, in seconds. For example, if '60' is written to modbus register 45107, the governor will go to high 'auto' RPM for 60 seconds.
- CAN command: A command might come to the governor from another module triggering the override. This is set up from the module used.
- 'Discharge' input: The discharge pressure input can be configured to be used as the trigger to control the override mode. This is discussed in more detail below.
More than one of the above can be used at a time. For example, if the 'discharge' input is used to trigger an override period, a modbus command will still be accepted and will become the new timer value.
Override Setup Page
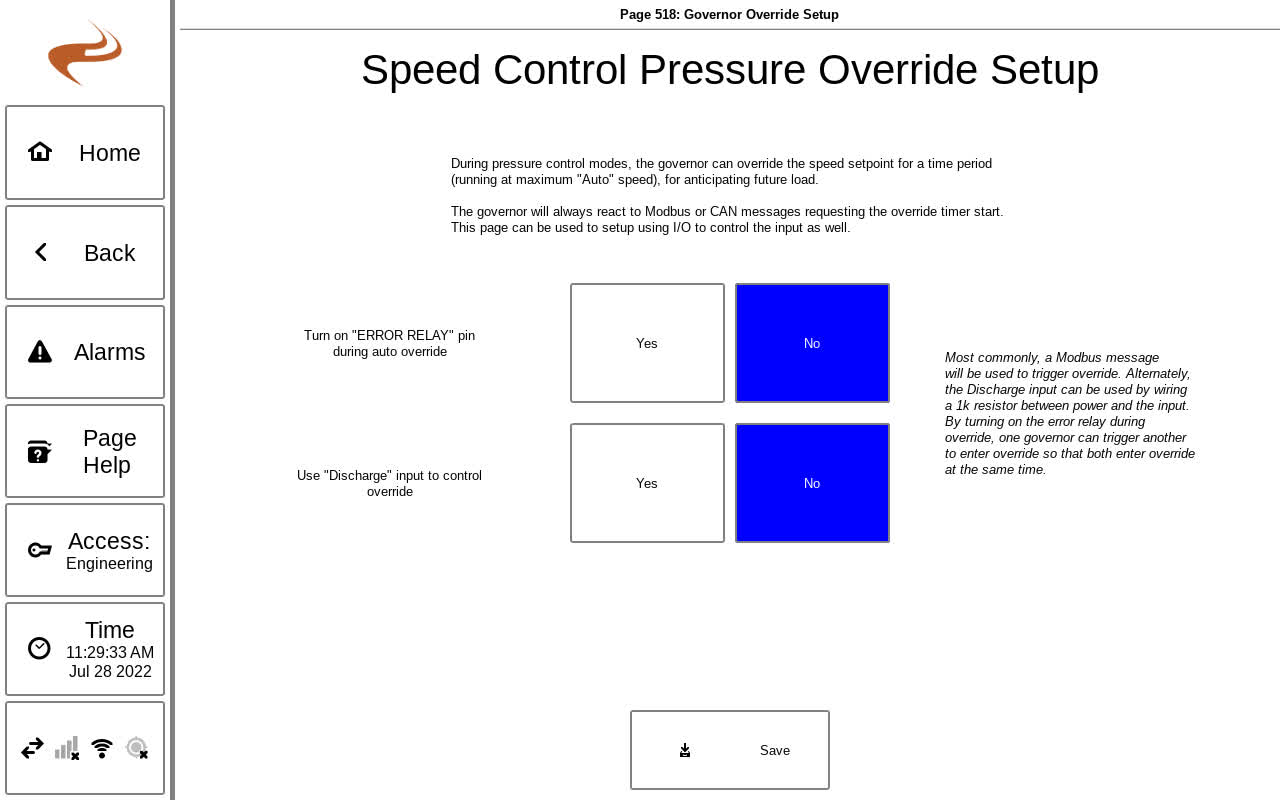
The override setup page is accessed from the governor setup, then "Pressure-Control Override Setup". The page is shown below.
The setting "Turn on 'Error Relay' output during override", if enabled, will cause the governor error relay to be on (closed to ground) whenever the override is active. This can be used to drive a lamp or to chain to another governor so that one master governor controls override on multiple units.
The next three options are related to the 'discharge' input trigger. This is discussed in the next section.
Discharge Input Setup
The discharge input can be used to trigger the governor override. This can work in one of two ways
- Signal at discharge starts timer: In this mode, "Use Discharge input to control override" is set to YES, and "Hold override while discharge input active" is set to NO. In this configuration, when the discharge input becomes active (more than 6 mA) the 'default discharge time' starts counting down for the override period. For example, if setup as shown in the above screenshot, when the discharge input goes from below 6mA to above 6mA the governor will go to override mode (full speed) for three minutes, then the timer expires and the speed returns to normal.
- Hold override while discharge active: In this mode, both "Use Discharge input to control override" and "Hold override while discharge input active" are set to YES. This causes the governor to constantly override (go full speed) while the discharge input is above 6mA. As soon as the input goes below 6mA, the override ends. This is the only use of override mode where there is no timer involved.
Note: If discharge input is used for triggering override, it will always show up as "0" in the datalog and on the sensors screen to prevent false recordings.
Wiring
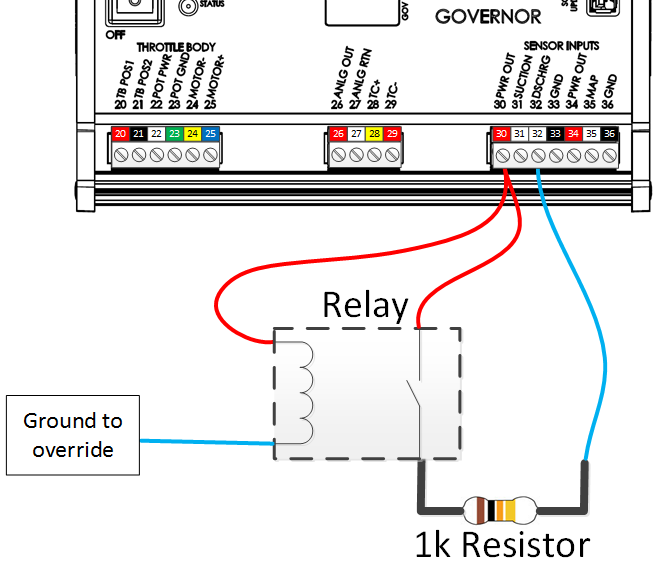
One method for wiring the discharge input to be above 6mA is the following:
- Wire one end of a normally-open relay contact to the "+12V OUT" on the governor
- Wire the other end to a 1kOhm resistor
- Wire the other end of the resistor to the discharge input
- Wire the coil side of the relay to any control source
In this way, when the relay turns on, the discharge input becomes active. This example is shown below.

