EIM Custom Modbus Map: Difference between revisions
Sean Sanders (talk | contribs) |
No edit summary |
||
| (One intermediate revision by one other user not shown) | |||
| Line 6: | Line 6: | ||
=== Downloading the old Modbus Map File === | === Downloading the old Modbus Map File === | ||
On the EIM, navigate to "System Settings/Utilities" followed by "MODBUS". | On the EIM, navigate to "System Settings/Utilities" followed by "MODBUS". | ||
On this page, select the button "Choose..." after "Custom map". | On this page, select the button "Choose..." after "Custom map". | ||
Latest revision as of 17:22, 4 August 2022
Background
The EIM contains the sole modbus (RS-485) connection for the entire system. However, each module's data is requested with a unique ID. Additionally, each module has a large number of registers, and for a given application only a small number are actually needed.
The EIM contains the feature where a custom modbus map can be uploaded which contains a list of target registers that are reassigned a new register number, and are moved to the EIM's modbus ID. This allows for a single request to pull the exact group of data that is needed.
Downloading the old Modbus Map File
On the EIM, navigate to "System Settings/Utilities" followed by "MODBUS".
On this page, select the button "Choose..." after "Custom map".
Insert a USB drive into the back of the EIM. Click the button "Download Current Map". Wait 10-20 seconds or until after the status says "Complete". A file customModbusMap.csv should now appear on the USB drive.
Editing the Modbus Map File
The Modbus map file, now on the USB, can be opened in Excel for editing. This file starts with one example row.
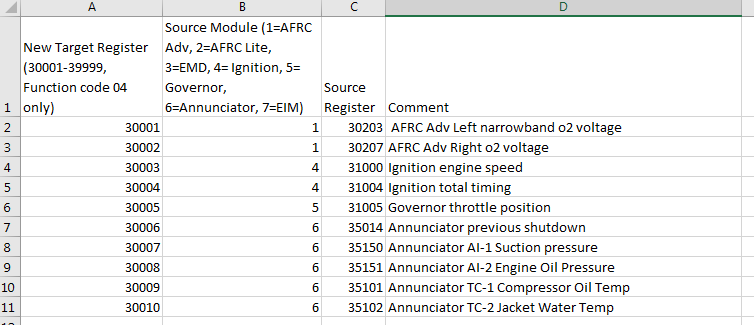
Start filling in the sheet with the registers that are needed. For each row, the columns will contain:
- Column A, "New Target Register": This column contains the new register that will be used by the external SCADA system to fetch this data value. In general, this column will start at 30001 and each subsequent row will be the next value.
- Column B, "Source Module": Put the source module number in this column, using the key in the first row.
- Column C, "Source Register": Put the source register for the data required
- Column D, "Comment": This column is ignored by the software. Any text can go here
An example table filled in might look like this:
Example
In the above example, a SCADA request to the EIM ID for register 30001, qty10, would return the above 10 registers in a row.
Uploading the new map
Once the above step is complete, save the file (keeping the format as csv). Put the USB drive back in the EIM and return to the custom modbus map screen. Now, click "Upload New Map From USB". After the upload is complete, restart the EIM and test out the new map.

