Annunciator Setup - Speed Control: Difference between revisions
Sean Sanders (talk | contribs) (Created page with "If an EMIT speed controller is not used on the engine, the annunciator can control speed through an analog output connected to the ECU or another governor that uses an analog input to control the speed setpoint. Whether or not the speed output is used, an idle permissive condition can also be added to control a digital output to hold the engine at idle. Either page is accessed from the main annunciator setup by selecting “Outputs Setup” followed by “Speed Control O...") |
No edit summary |
||
| (2 intermediate revisions by one other user not shown) | |||
| Line 1: | Line 1: | ||
If an EMIT | If an EMIT governor is not used on the engine, the Brain can control speed through an analog output connected to the ECU or another governor that uses an analog input to control the speed setpoint. Whether or not the speed output is used, an idle permissive condition can also be added to control a digital output to hold the engine at idle. Each of these two functions will be covered separately below. | ||
=== | == Idle Hold Setup == | ||
The Idle Hold Setup page is accessed from “Outputs Setup” -> “Idle Hold Settings”. | |||
[[File:660 Core IdleControl.png|800px]] | |||
The idle hold condition is an optional condition that will keep the engine at idle until some criteria is met. Usually, this is a lubricant temperature reaching a certain point. While the condition is not met, a selected digital output is on. This digital output can be wired to an ECU input that holds the engine at idle, or to a relay that sends the fixed idle speed voltage into a remote speed input of an ECU or governor. The output can also be wired to an indicator on the panel. The idle hold can be used whether or not the speed control output is used. If the speed control analog output is used, that output will also be at a fixed idle speed during idle hold. | |||
The idle hold | |||
To specify an idle hold condition, select “Yes” for using idle hold. Under idle hold setup, select the button to pick an available digital output to turn on when idle hold is active. Select the second button to select an idle hold condition. For the condition, pick any input, then a threshold value and whether the hold should continue until the input is above or below that value. | |||
On newer versions, there is a second idle hold condition that can be used. If two conditions are used then both have to be met before the idle permissive is met. | |||
==Speed Control Output== | |||
As mentioned above, one analog output can be used to output a target engine speed to another speed controller or engine control unit. This configuration is accessed from “Outputs Setup” -> “Speed Control Output Setup”. The first page of setup is shown below. | |||
[[File:Speed Control Setup 1.jpg]] | |||
Options on this page include: | |||
*'''Using Analog Speed Control Output''': Select “Yes” to continue with setup, or “No” to disable. | |||
*'''Idle RPM''': This speed will be sent to the speed controller when “Idle” is selected. If an idle contact is also used, this setting will likely have no affect. | |||
*'''Analog Output''': Choose which pin to use for the speed output. Usually AO-1 is used. | |||
*'''Output Type''': This specifies the analog output type to use. This should match what the ECU is expecting as an input. | |||
*'''ECU RPM at LOW/HIGH''': This value should match what the ECU is expecting the low and high analog value to represent | |||
The next step of speed control control setup configures the actual control settings for the speed. | |||
The | |||
[[File:Speed Control Setup 2.jpg]] | |||
''Speed Control Output Setup 2'' | |||
The control type can be either “Fixed Speed”, “Control to Sensor Value”, or “Pass Through”. If fixed speed is used, the only other setting needed is the speed setpoint. In this case, the system will simply output a fixed analog value to keep the speed at this point. For “Pass Through”, the Brain simply passes an analog input to the output. If controlling to a sensor value, more settings are available, which are outlined below. | |||
If | |||
*Choose Sensor: Select this button to choose the sensor the speed is controlling around. If this sensor is too low or high the speed will be adjusted. Most commonly this will be suction or final discharge pressure. | |||
*Second Sensor (optional): If the DCT is at 1.44 or newer a second sensor can be specified for control. Both will be used as either high-select or low-select which is specified on the next page. | |||
*Change Rate: The change rate defines the percentage of the operating range that the rpm will swing in one second. For example, if set to 50% then it will take two seconds to ramp from the low to the high range if required. Setting to a lower value will slow down the control. | |||
*Auto Operating Range: This defines the operating RPM range for the speed output. If the output reaches one of these limits and the sensor is still out of setpoint range, the RPM will be clamped to this value. These limits keep the engine from going too fast or slow when trying to meet the setpoint. | |||
If | If the control type is “Control to Sensor Value”, a third page will be shown next. | ||
[[File:Speed-3.png]] | |||
* Setpoint ( | *Control Type: This can be set to either “Setpoint / Deadband” or “Linear Ramp”. For Setpoint/Deadband, a target value will be specified along with a deadband- if the sensor value is outside this range the speed target will change. In Linear Ramp mode, the speed target will be linearly interpolated between the low and high sensor value / RPM pairs. | ||
* | *(If in Setpoint Mode) Setpoint: This is the target value for the sensor chosen. For some types of sensors, such as discharge or manifold, this setpoint should be held fairly close. For some, such as suction, the speed will spend a lot of time near the limits and the setpoint is more of a cross-over point when the sensor goes from high/low or low/high. | ||
* | *(If in Setpoint Mode) Deadband: The deadband defines a region around the setpoint where the speed will not change. | ||
*(If in Linear Ramp Mode) Low Setpoint / High Setpoint: This specifies the low and high sensor reading that corresponds to the low and high RPM. | |||
*Positive or Negative Control: This setting controls the direction the speed will change to meet the target setpoint. For positive control, increasing the RPM will increase the sensor, such as manifold or discharge pressure. For negative control, increasing the RPM will decrease the sensor, such as suction pressure. | |||
* Positive or Negative Control: This setting controls the direction the speed will change to meet the target setpoint. For positive control, increasing the RPM will increase the sensor, such as manifold or discharge pressure. For negative control, increasing the RPM will decrease the sensor, such as suction pressure | |||
After reviewing the entered settings, select “Submit” to save. | After reviewing the entered settings, select “Submit” to save. | ||
Latest revision as of 21:22, 4 August 2022
If an EMIT governor is not used on the engine, the Brain can control speed through an analog output connected to the ECU or another governor that uses an analog input to control the speed setpoint. Whether or not the speed output is used, an idle permissive condition can also be added to control a digital output to hold the engine at idle. Each of these two functions will be covered separately below.
Idle Hold Setup
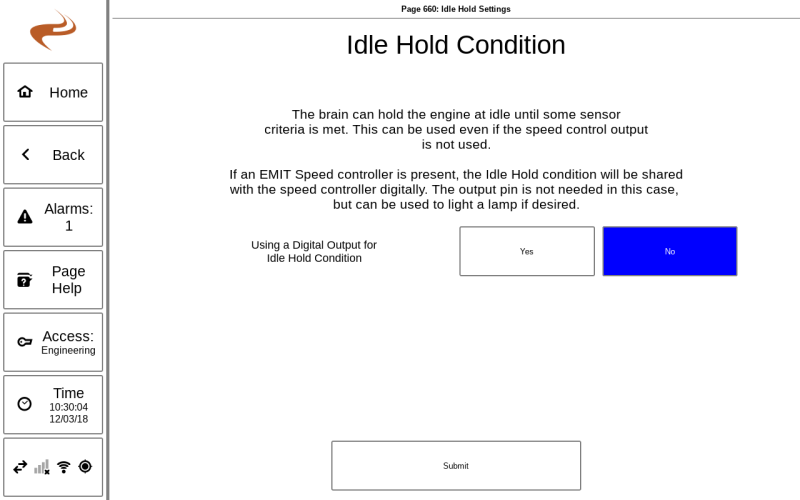
The Idle Hold Setup page is accessed from “Outputs Setup” -> “Idle Hold Settings”.
The idle hold condition is an optional condition that will keep the engine at idle until some criteria is met. Usually, this is a lubricant temperature reaching a certain point. While the condition is not met, a selected digital output is on. This digital output can be wired to an ECU input that holds the engine at idle, or to a relay that sends the fixed idle speed voltage into a remote speed input of an ECU or governor. The output can also be wired to an indicator on the panel. The idle hold can be used whether or not the speed control output is used. If the speed control analog output is used, that output will also be at a fixed idle speed during idle hold.
To specify an idle hold condition, select “Yes” for using idle hold. Under idle hold setup, select the button to pick an available digital output to turn on when idle hold is active. Select the second button to select an idle hold condition. For the condition, pick any input, then a threshold value and whether the hold should continue until the input is above or below that value.
On newer versions, there is a second idle hold condition that can be used. If two conditions are used then both have to be met before the idle permissive is met.
Speed Control Output
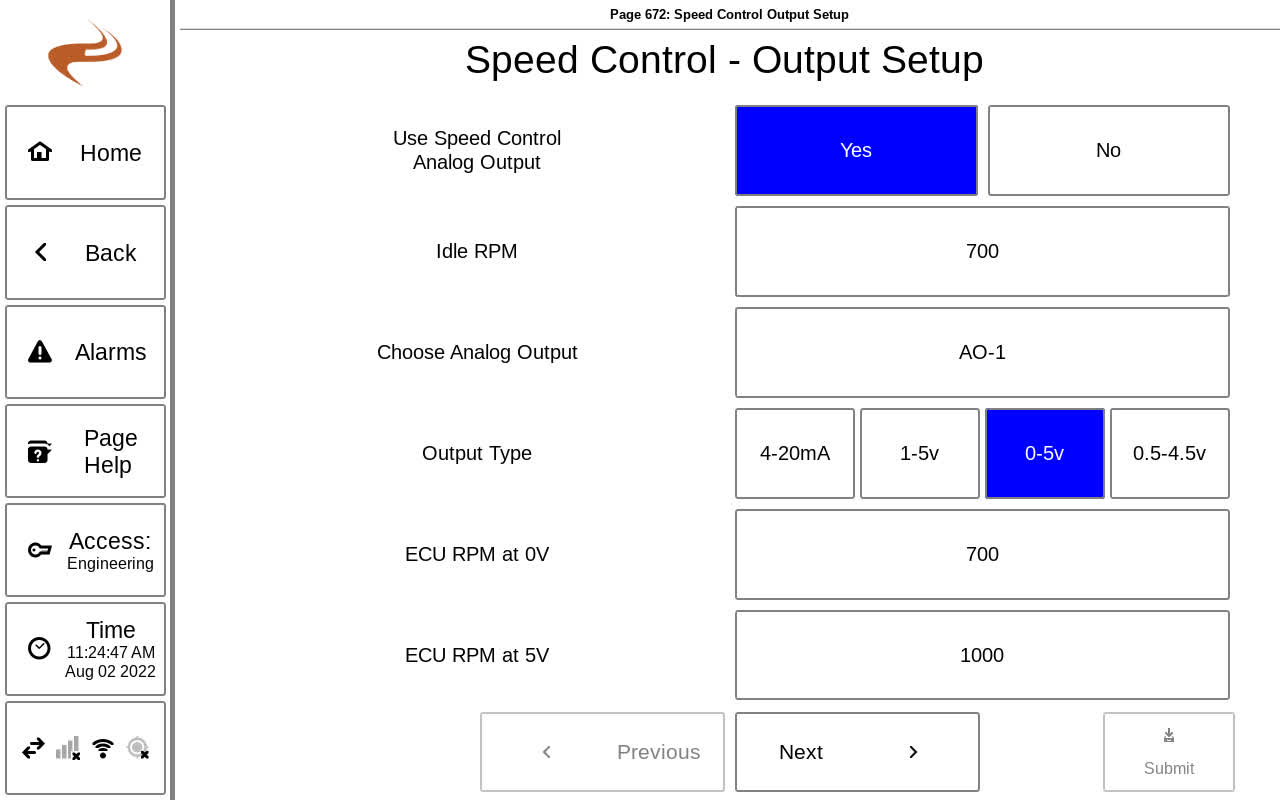
As mentioned above, one analog output can be used to output a target engine speed to another speed controller or engine control unit. This configuration is accessed from “Outputs Setup” -> “Speed Control Output Setup”. The first page of setup is shown below.
Options on this page include:
- Using Analog Speed Control Output: Select “Yes” to continue with setup, or “No” to disable.
- Idle RPM: This speed will be sent to the speed controller when “Idle” is selected. If an idle contact is also used, this setting will likely have no affect.
- Analog Output: Choose which pin to use for the speed output. Usually AO-1 is used.
- Output Type: This specifies the analog output type to use. This should match what the ECU is expecting as an input.
- ECU RPM at LOW/HIGH: This value should match what the ECU is expecting the low and high analog value to represent
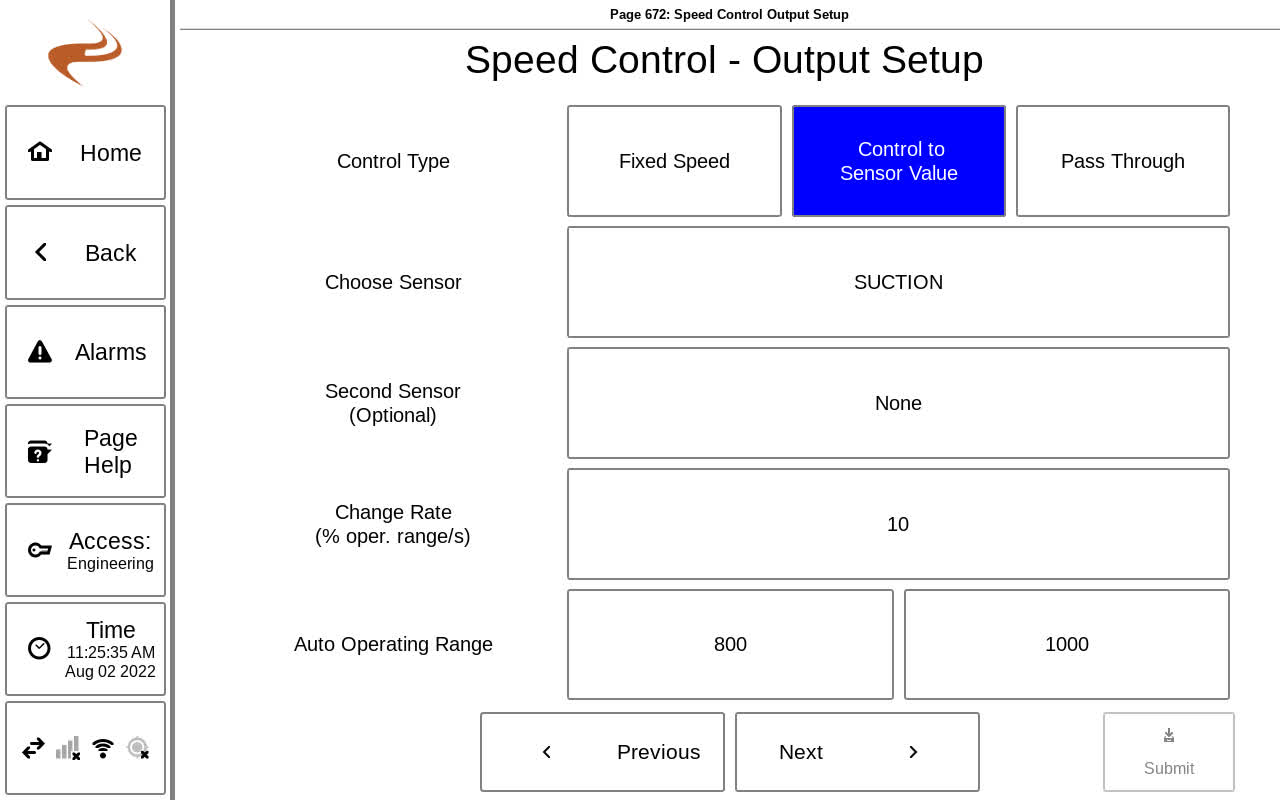
The next step of speed control control setup configures the actual control settings for the speed.
Speed Control Output Setup 2
The control type can be either “Fixed Speed”, “Control to Sensor Value”, or “Pass Through”. If fixed speed is used, the only other setting needed is the speed setpoint. In this case, the system will simply output a fixed analog value to keep the speed at this point. For “Pass Through”, the Brain simply passes an analog input to the output. If controlling to a sensor value, more settings are available, which are outlined below.
- Choose Sensor: Select this button to choose the sensor the speed is controlling around. If this sensor is too low or high the speed will be adjusted. Most commonly this will be suction or final discharge pressure.
- Second Sensor (optional): If the DCT is at 1.44 or newer a second sensor can be specified for control. Both will be used as either high-select or low-select which is specified on the next page.
- Change Rate: The change rate defines the percentage of the operating range that the rpm will swing in one second. For example, if set to 50% then it will take two seconds to ramp from the low to the high range if required. Setting to a lower value will slow down the control.
- Auto Operating Range: This defines the operating RPM range for the speed output. If the output reaches one of these limits and the sensor is still out of setpoint range, the RPM will be clamped to this value. These limits keep the engine from going too fast or slow when trying to meet the setpoint.
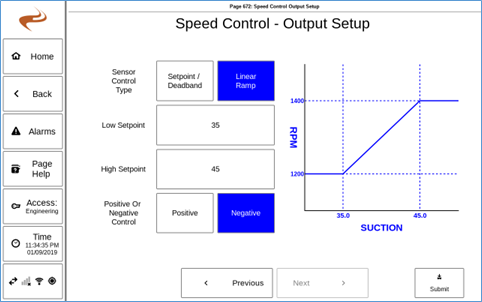
If the control type is “Control to Sensor Value”, a third page will be shown next.
- Control Type: This can be set to either “Setpoint / Deadband” or “Linear Ramp”. For Setpoint/Deadband, a target value will be specified along with a deadband- if the sensor value is outside this range the speed target will change. In Linear Ramp mode, the speed target will be linearly interpolated between the low and high sensor value / RPM pairs.
- (If in Setpoint Mode) Setpoint: This is the target value for the sensor chosen. For some types of sensors, such as discharge or manifold, this setpoint should be held fairly close. For some, such as suction, the speed will spend a lot of time near the limits and the setpoint is more of a cross-over point when the sensor goes from high/low or low/high.
- (If in Setpoint Mode) Deadband: The deadband defines a region around the setpoint where the speed will not change.
- (If in Linear Ramp Mode) Low Setpoint / High Setpoint: This specifies the low and high sensor reading that corresponds to the low and high RPM.
- Positive or Negative Control: This setting controls the direction the speed will change to meet the target setpoint. For positive control, increasing the RPM will increase the sensor, such as manifold or discharge pressure. For negative control, increasing the RPM will decrease the sensor, such as suction pressure.
After reviewing the entered settings, select “Submit” to save.


