EDR Loopback Test
From EMIT Controls
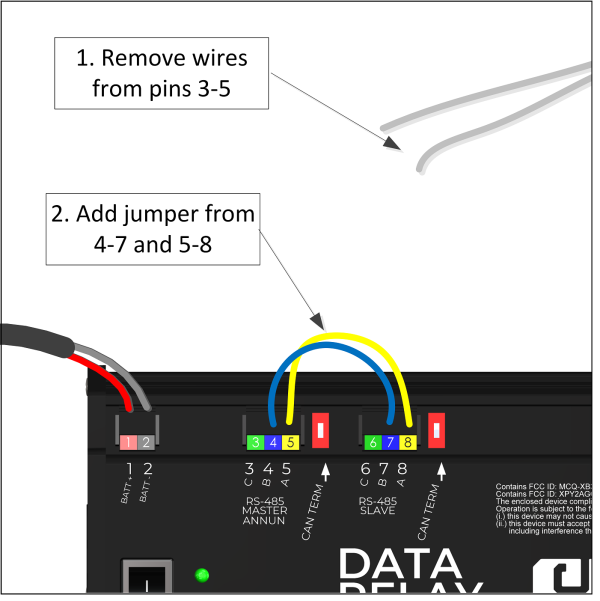
Revision as of 21:25, 5 January 2024 by Thomas Peterson (talk | contribs) (Created page with "A loopback test involves setting up the EDR to communicate from its own master to slave port. This tests that both ports are functional. ==Test Instructions== * Disconnect any wires in the EDR pins 3-8 and set aside. (We recommend taping over the wires so they don't short to anything) * With two spare short wires, connect 4-7 and 5-8 600px * Connect to the EDR wifi (See here for instructions) * On the "Modbus Mas...")
A loopback test involves setting up the EDR to communicate from its own master to slave port. This tests that both ports are functional.
Test Instructions
- Disconnect any wires in the EDR pins 3-8 and set aside. (We recommend taping over the wires so they don't short to anything)
- With two spare short wires, connect 4-7 and 5-8
- Connect to the EDR wifi (See here for instructions)
- On the "Modbus Master" tab, pick any row that has a register set to something other than "0", and set the ID to "10"
- Within one minute, the value should go to some number and the age should reset to 0s and start counting up (TEST PASS)
- If the test passes, the module comm hardware is verified ok
If test fails
If the test fails, check a couple other settings:
- Under Modbus Master - Network Configuration, verify this config: Baud 9600, data size 8 bit, parity none, stop bits 1, and "use serial" box is checked
- Under Modbus Slave - Network Configuration, the slave ID should be 10
- Under Modbus Slave - Network Configuration, verify this config: Baud 9600, data size 8 bit, parity none, stop bits 1
If the above is verified and the test still fails, the module ports are likely bad.
After the test
- Return wires to original locations
- Set the modbus master row where the ID was changed to "10" back to the original ID (usually "1")
