Portal Callout Scheduling
The web portal at https://data.emittechnologies.com/ can be used to set up callout functionality for active units.
General Concepts
Contact
A contact represents a person who can be contacted for a callout. The person can get text messages, phone calls, emails, or some combination of these. First, a contact for a person has to be created.
Creating a new contact
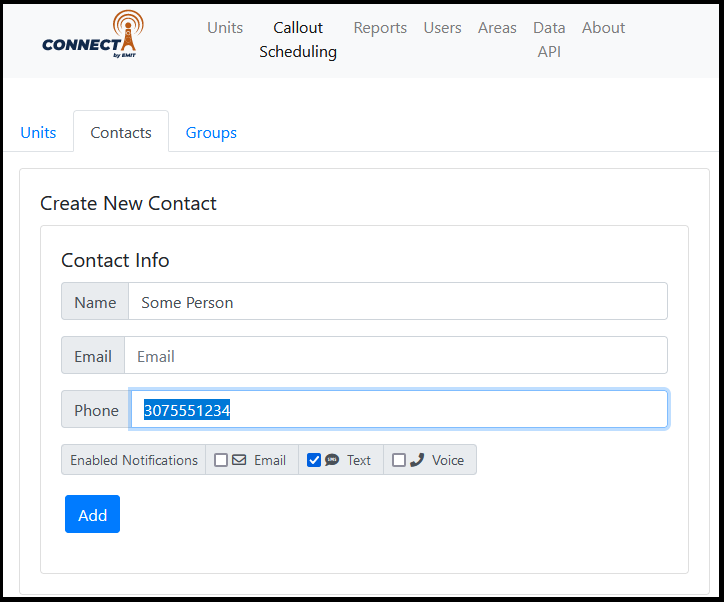
On the site, select the "Callout Scheduling" section at the top. Next, select the "Contacts" tab.
At the top of the tab enter the name and email and/or phone for a person. Select the checkboxes for the type of messages the person can get- email, text, and/or voice. Then, select "Add". The person will then go into the contacts list on this page.
Tip: If the contact is for a customer, add the company to the name as well to help with searching later.
Editing a contact
In the lower part of the Contacts page is a list of all contacts. They can be filtered by typing in a name in the filter box. Select a name and it will go to the contact edit page, which looks very similar to the "Create New Contact" box shown above. On the contact edit page the name, email, phone, and enabled notifications checkboxes can be changed. Be sure to select "Save" when done.
Group
A group is a group of people that will be contacted together. It can be used to group contacts for an area, part of an area, customer contacts in the area, etc. Using groups makes setting up and changing callouts easier because once the group is on some units if there is a change in the contact list it can be edited once in the group rather than on every unit. A contact can be in multiple groups.
Creating a new group
To create a new group, click on "Callout Scheduling" at the top of the page then "Groups" just below that. At the top of the Groups tab enter a new group name in the "Name" box and then click "Create".
Adding people to a group
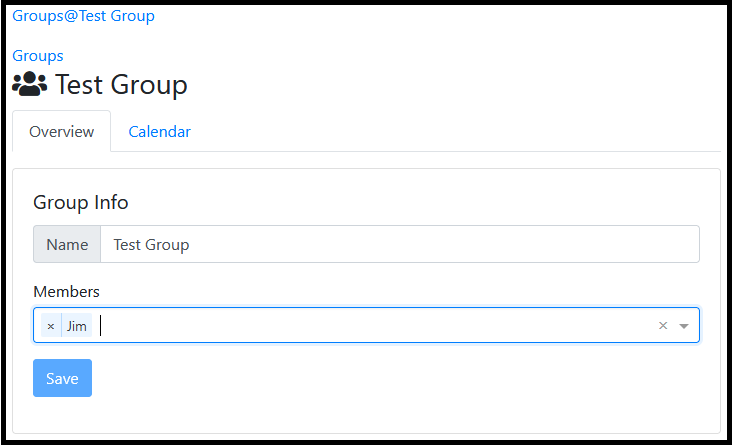
On the lower part of the Groups page is a list of existing groups. Select a group name to go to the Group edit page.
Click in the "Members" box and search by name to find a contact, then select to add to the group. Members can be removed from the group by clicking "x" next to the name.
Be sure to select "Save" when finished.
Adding Contacts or Groups to a Unit
Once the relevant contacts and/or groups have been created they can now be assigned to units.
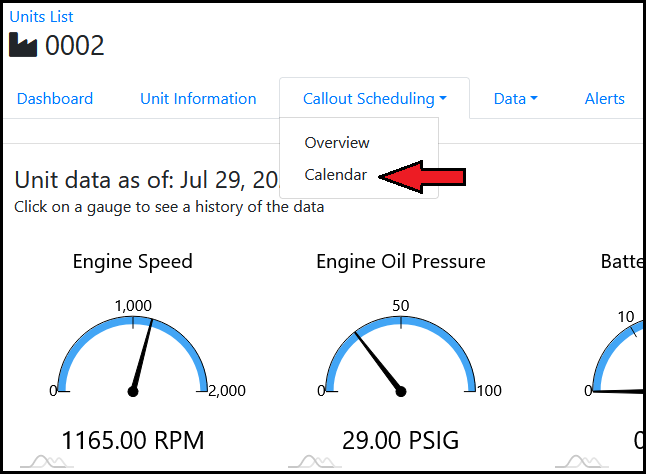
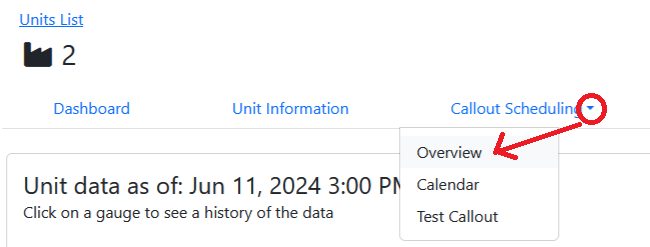
To edit a unit callout schedule select the unit from the home page to go to the dashboard. Then select the "Callout Scheduling" dropdown followed by "Calendar".
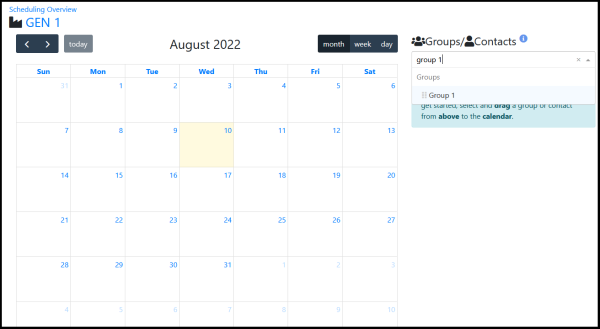
This will go to the calendar page for a unit. There is both a simple mode (usual case) and an advanced mode for scheduling users. For adding contacts/groups to a unit, the simplified mode is the most straightforward. Select the contact/group from the dropdown and click Save, they will be assigned onto the unit.
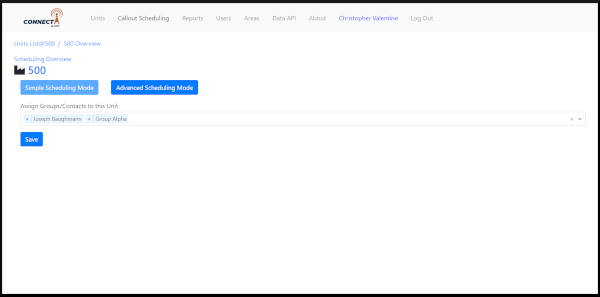 Simplified mode for scheduling contacts/groups to a unit
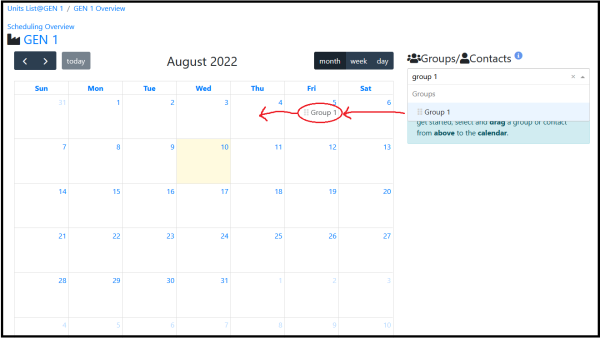
Advanced mode enables the user to create more complicated schedules, where contacts can be selectively scheduled for specific blocks of time. To add a person or group to a unit, use the search box on the right to find a person or group, then drag it over onto the calendar.
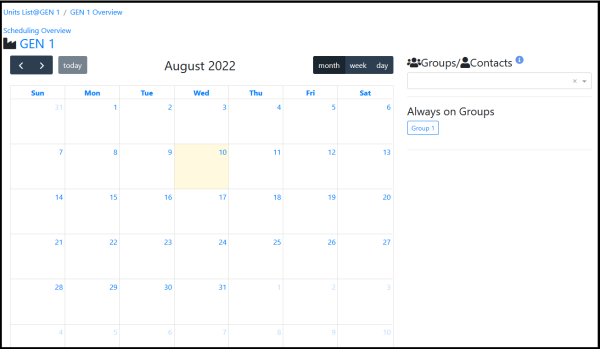
After dragging a contact or group onto the calendar, it should appear in the "Always on contacts" list on the right side.
To later remove a group or contact from a unit select the name on the calendar page then "Remove from Unit".
Viewing Summary
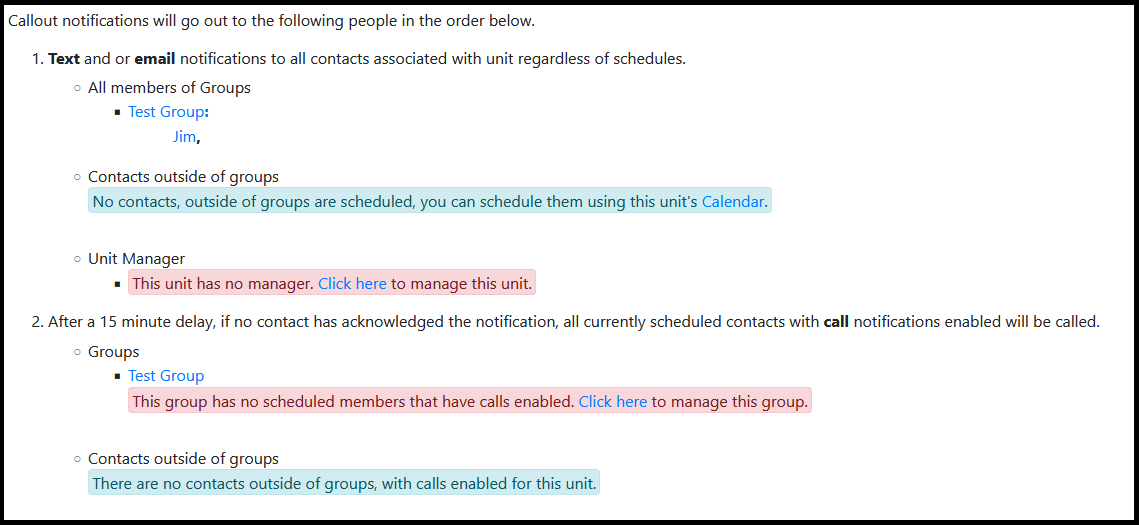
A summary of who will be contacted is shown under a unit "Callout Scheduling" -> "Overview"
The summary will show everyone either individually on a unit, or on the unit under a group. All group members will be texted and/or emailed when a unit starts or stops depending on if they have the text, email, or both checked under their contact.
The callout summary also lists the logic of if anyone can be called (discussed in the next section).
Voice Calls
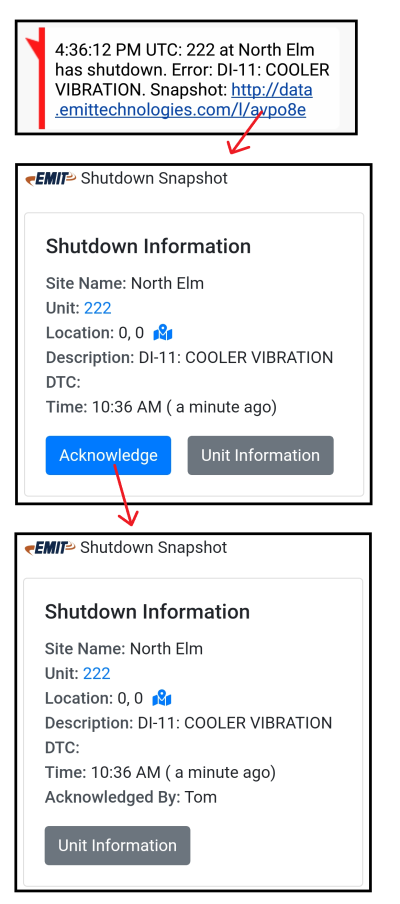
When a unit has a shutdown event all the eligible contacts on the unit (either individually or in a group assigned to the unit) will be texted and/or emailed. The notification will have a link that can be followed which shows some info about the shutdown. There is a button on this page that can be selected to acknowledge an alarm. This is meant to signify that someone is responding to the event. Anyone who visits the callout link later will see who acknowledged it first.
If no one acknowledges an alarm within 15 minutes then the system will start sending out voice calls to eligible contacts. To receive a call, all of these conditions have to be met:
- The alarm was not acknowledged within 15 minutes
- The contact has the voice checkbox enabled on the contact edit page
- The contact is on schedule to receive calls, either individually on a unit or a group (see below)
- If part of a group, the group to unit assignment has the voice calls box enabled
Scheduling a contact
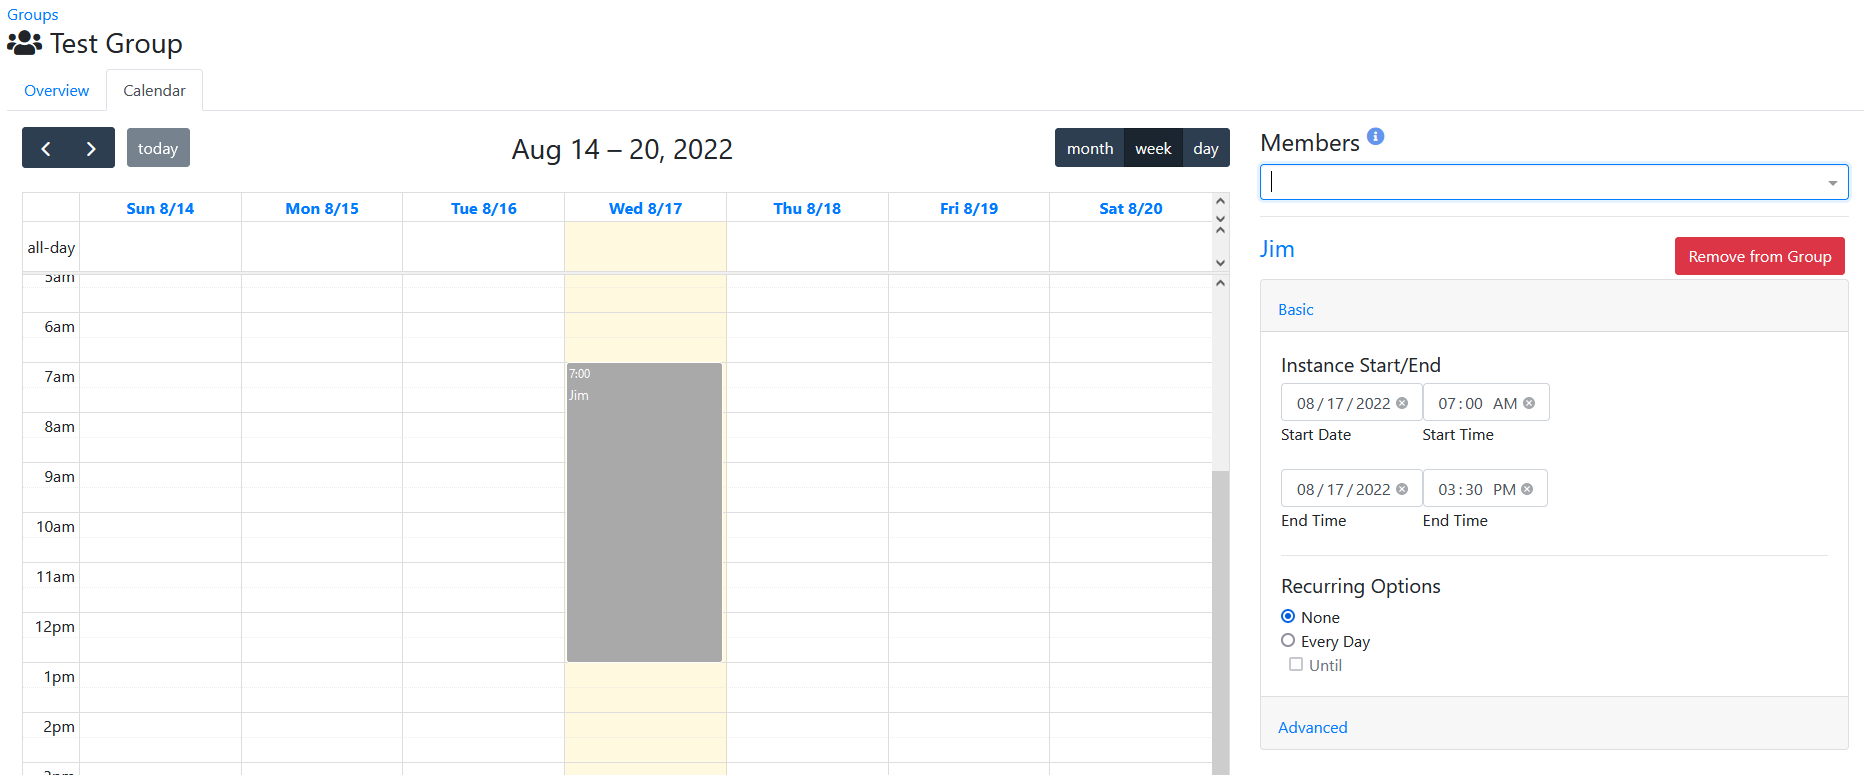
A contact can be scheduled to receive calls on a unit or through a group. In most cases a contact will be scheduled in a group since this is simpler than doing it through the unit calendar. On a group edit page there is a Calendar tab for scheduling calls. Persons in the group can be dragged onto the calendar and will initially appear as always on call. By selecting the name to the right, the details of the schedule can be edited such as the time of day and which days repeat.
If switched to "Week" or "Day" mode the contact can be put in a specific time block more easily.
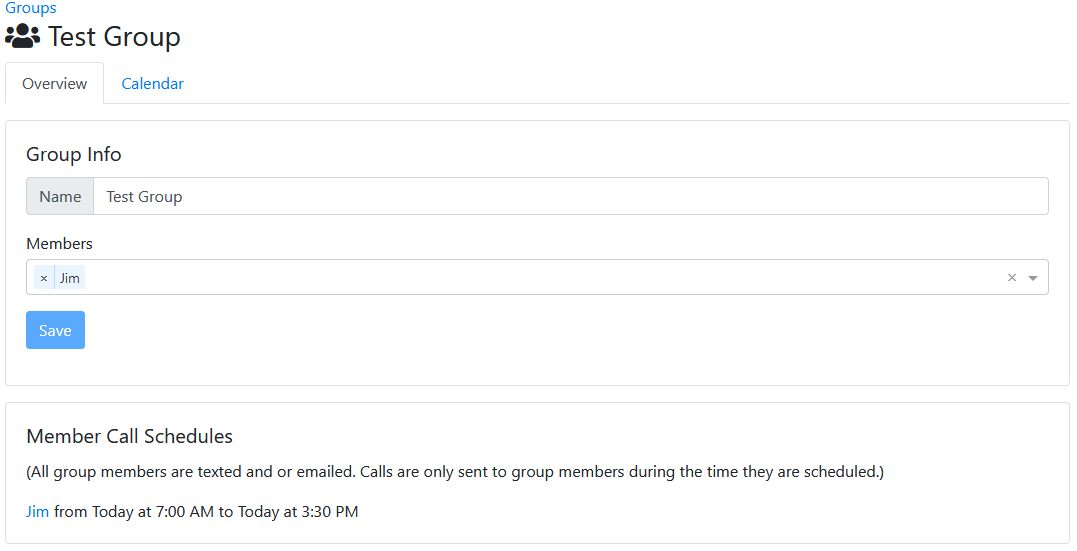
After scheduling a person, the group overview tab will show the call schedule at the bottom.
Note that not everyone in the group has to have a call schedule. ALL people under the Members list at the top will receive texts and/or emails. Only the people in the lower list will receive calls if they have calls enabled for their contact and the other criteria are met mentioned above.
Checking a Schedule
To verify that the voice calls are set up correctly, go to a unit that is using the group. Then navigate to the callout dropdown and select summary.
The summary page will show the exact logic and who can get calls when, and will show if someone can't get a call for some reason.
